Unveiling the Unconventional: My Local Blog Hosting Adventure

Hi there👋! I wanted to share my blogging journey. I started because I wanted to share what I know with others, but I didn’t want to deal with the stress of recording videos for YouTube. So, I chose to write articles instead. I found a way to host my blog at home on a simple computer. Here’s how I did it.
The Motivation 💪:
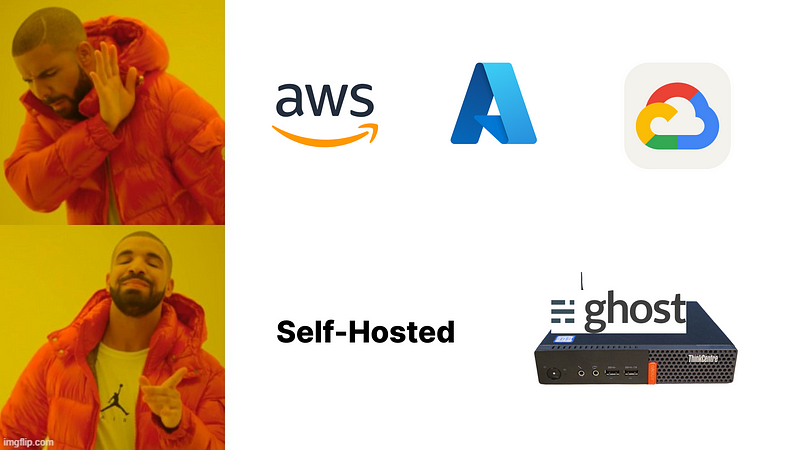
My journey began with a simple question: how could I share my knowledge without the flashiness of cloud platforms and the intimidating bills from giants like AWS or Azure? I craved simplicity and cost-effectiveness. And so, I set out on an unconventional path to create a solution that would allow anyone on the internet to access my blog.
Prerequisites ✅:
Before I could embark on this unique hosting journey, I had to gather a few essentials:
- A Computer: Any old laptop or even a Raspberry Pi would do. In my case, I purchased a refurbished Small Form Factor (SFF) PC.
- An Active Internet Connection.
- A Domain Name.
- A Willingness to Learn and Debug.
Setting Up My Self-Hosted Blog 🏡:
Let’s break down the steps I took to set up my blog just the way I wanted it:
Acquiring My Server: My trusty SFF PC became my server for this adventure.
Choosing My CMS: I selected an open-source CMS named Ghost for my blog, with the idea that I might eventually create my own CMS if I decided to continue blogging in the long run.
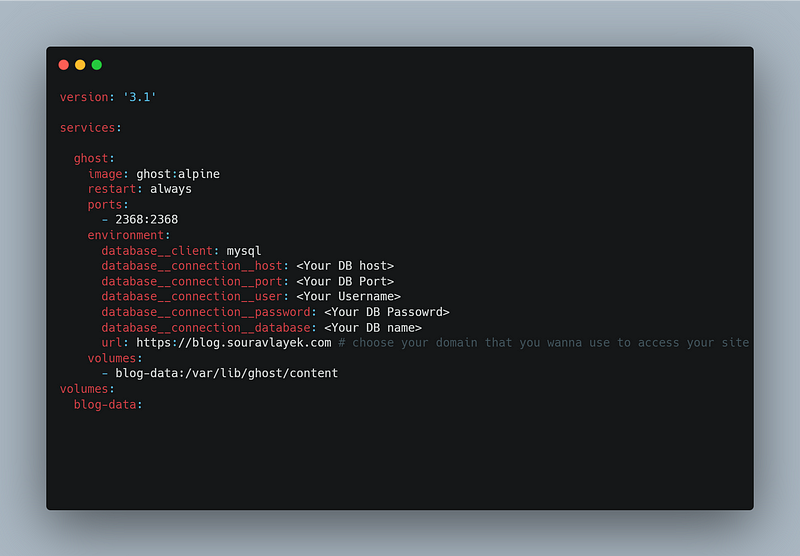
Setting Up the CMS: I installed Docker on my server and used this docker-compose file to run my blog locally in a container.
Making My Blog Accessible 🌐:
While my blog was now accessible within my home network, the next challenge was making it available to the entire internet. This is where Cloudflare Tunnel came to my rescue, creating a secure connection to my service.
Creating a tunnel was as easy as 1–2–3:
1. Connecting My Domain: I simply added my domain to my Cloudflare account. (You can follow this)
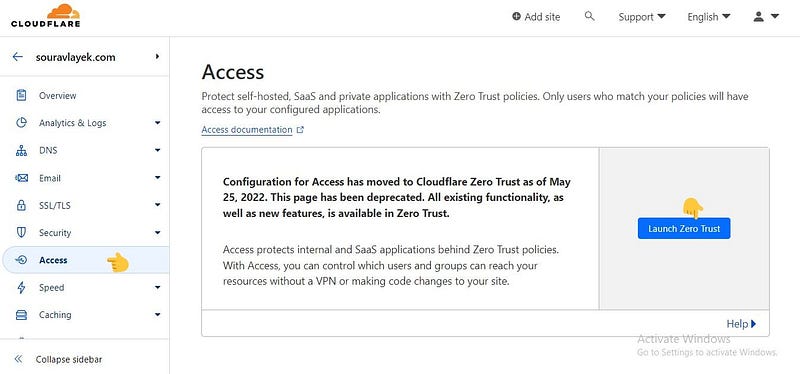
2. Connecting My Local System: I visited the Zero Trust Portal and created a tunnel. They provided a single command to run in my server’s terminal. Here are the steps
Click on the access and click on the Zero Trust
Now inside your Zero trust portal click on access and then tunnel
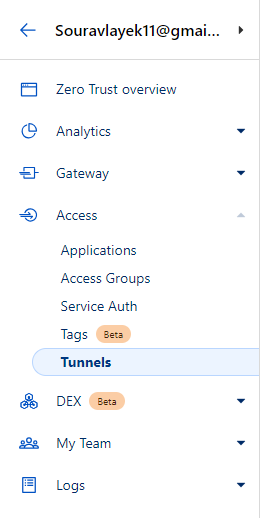
Now here just In the tunnel page click on create tunnel, and follow the steps to connect to your system.
3. Configuring the Public Hostname: I specified my subdomain (optional) and set the service type to HTTP. The URL pointed to my server’s localhost and the exposed port (e.g., localhost:2363).
Challenges and Considerations:
Of course, my unconventional setup came with its own set of challenges. If my system crashed or I faced a power outage, my blog would go offline. Data loss was a real risk, so I emphasized the importance of regular backups.
Conclusion:
Hosting a self-hosted blog locally on a modest PC may not be the most common approach, but it allowed me to share my thoughts and knowledge without the constraints of camera fear or hefty cloud bills. With the right prerequisites, a suitable CMS, and the guidance of tools like Cloudflare Tunnel, this unconventional path became a viable option for me, and it could be for you too.