The Hidden Stripe Debugging Hack Every Developer Should Know

Stripe’s payment flow is robust—but testing their webhook locally can feel like debugging in a sealed box. Here’s how I cracked that open with ngrok.
🚫 The Invisible Wall: Stripe → Your Code
As a senior engineer, I know the principle of fast feedback loops is sacred. Yet when working on a recent Stripe integration, I hit a bottleneck that broke that loop:
“Stripe only sends events to HTTPS endpoints. And localhost isn’t HTTPS.”
If you’re building a full-stack app—say with Next.js or FastAPI—and you want to confirm a payment_intent.succeeded event triggers your business logic, you’re stuck unless you’re:
- Deploying half-baked code
- Exposing your public IP (a security nightmare)
- Writing guess-driven logic and testing it blind
That’s a massive productivity tax.
🧠 Understanding Stripe’s Payment Flow (for Real)
Before diving into solutions, let’s align on how Stripe processes a payment—because many devs only understand this superficially.
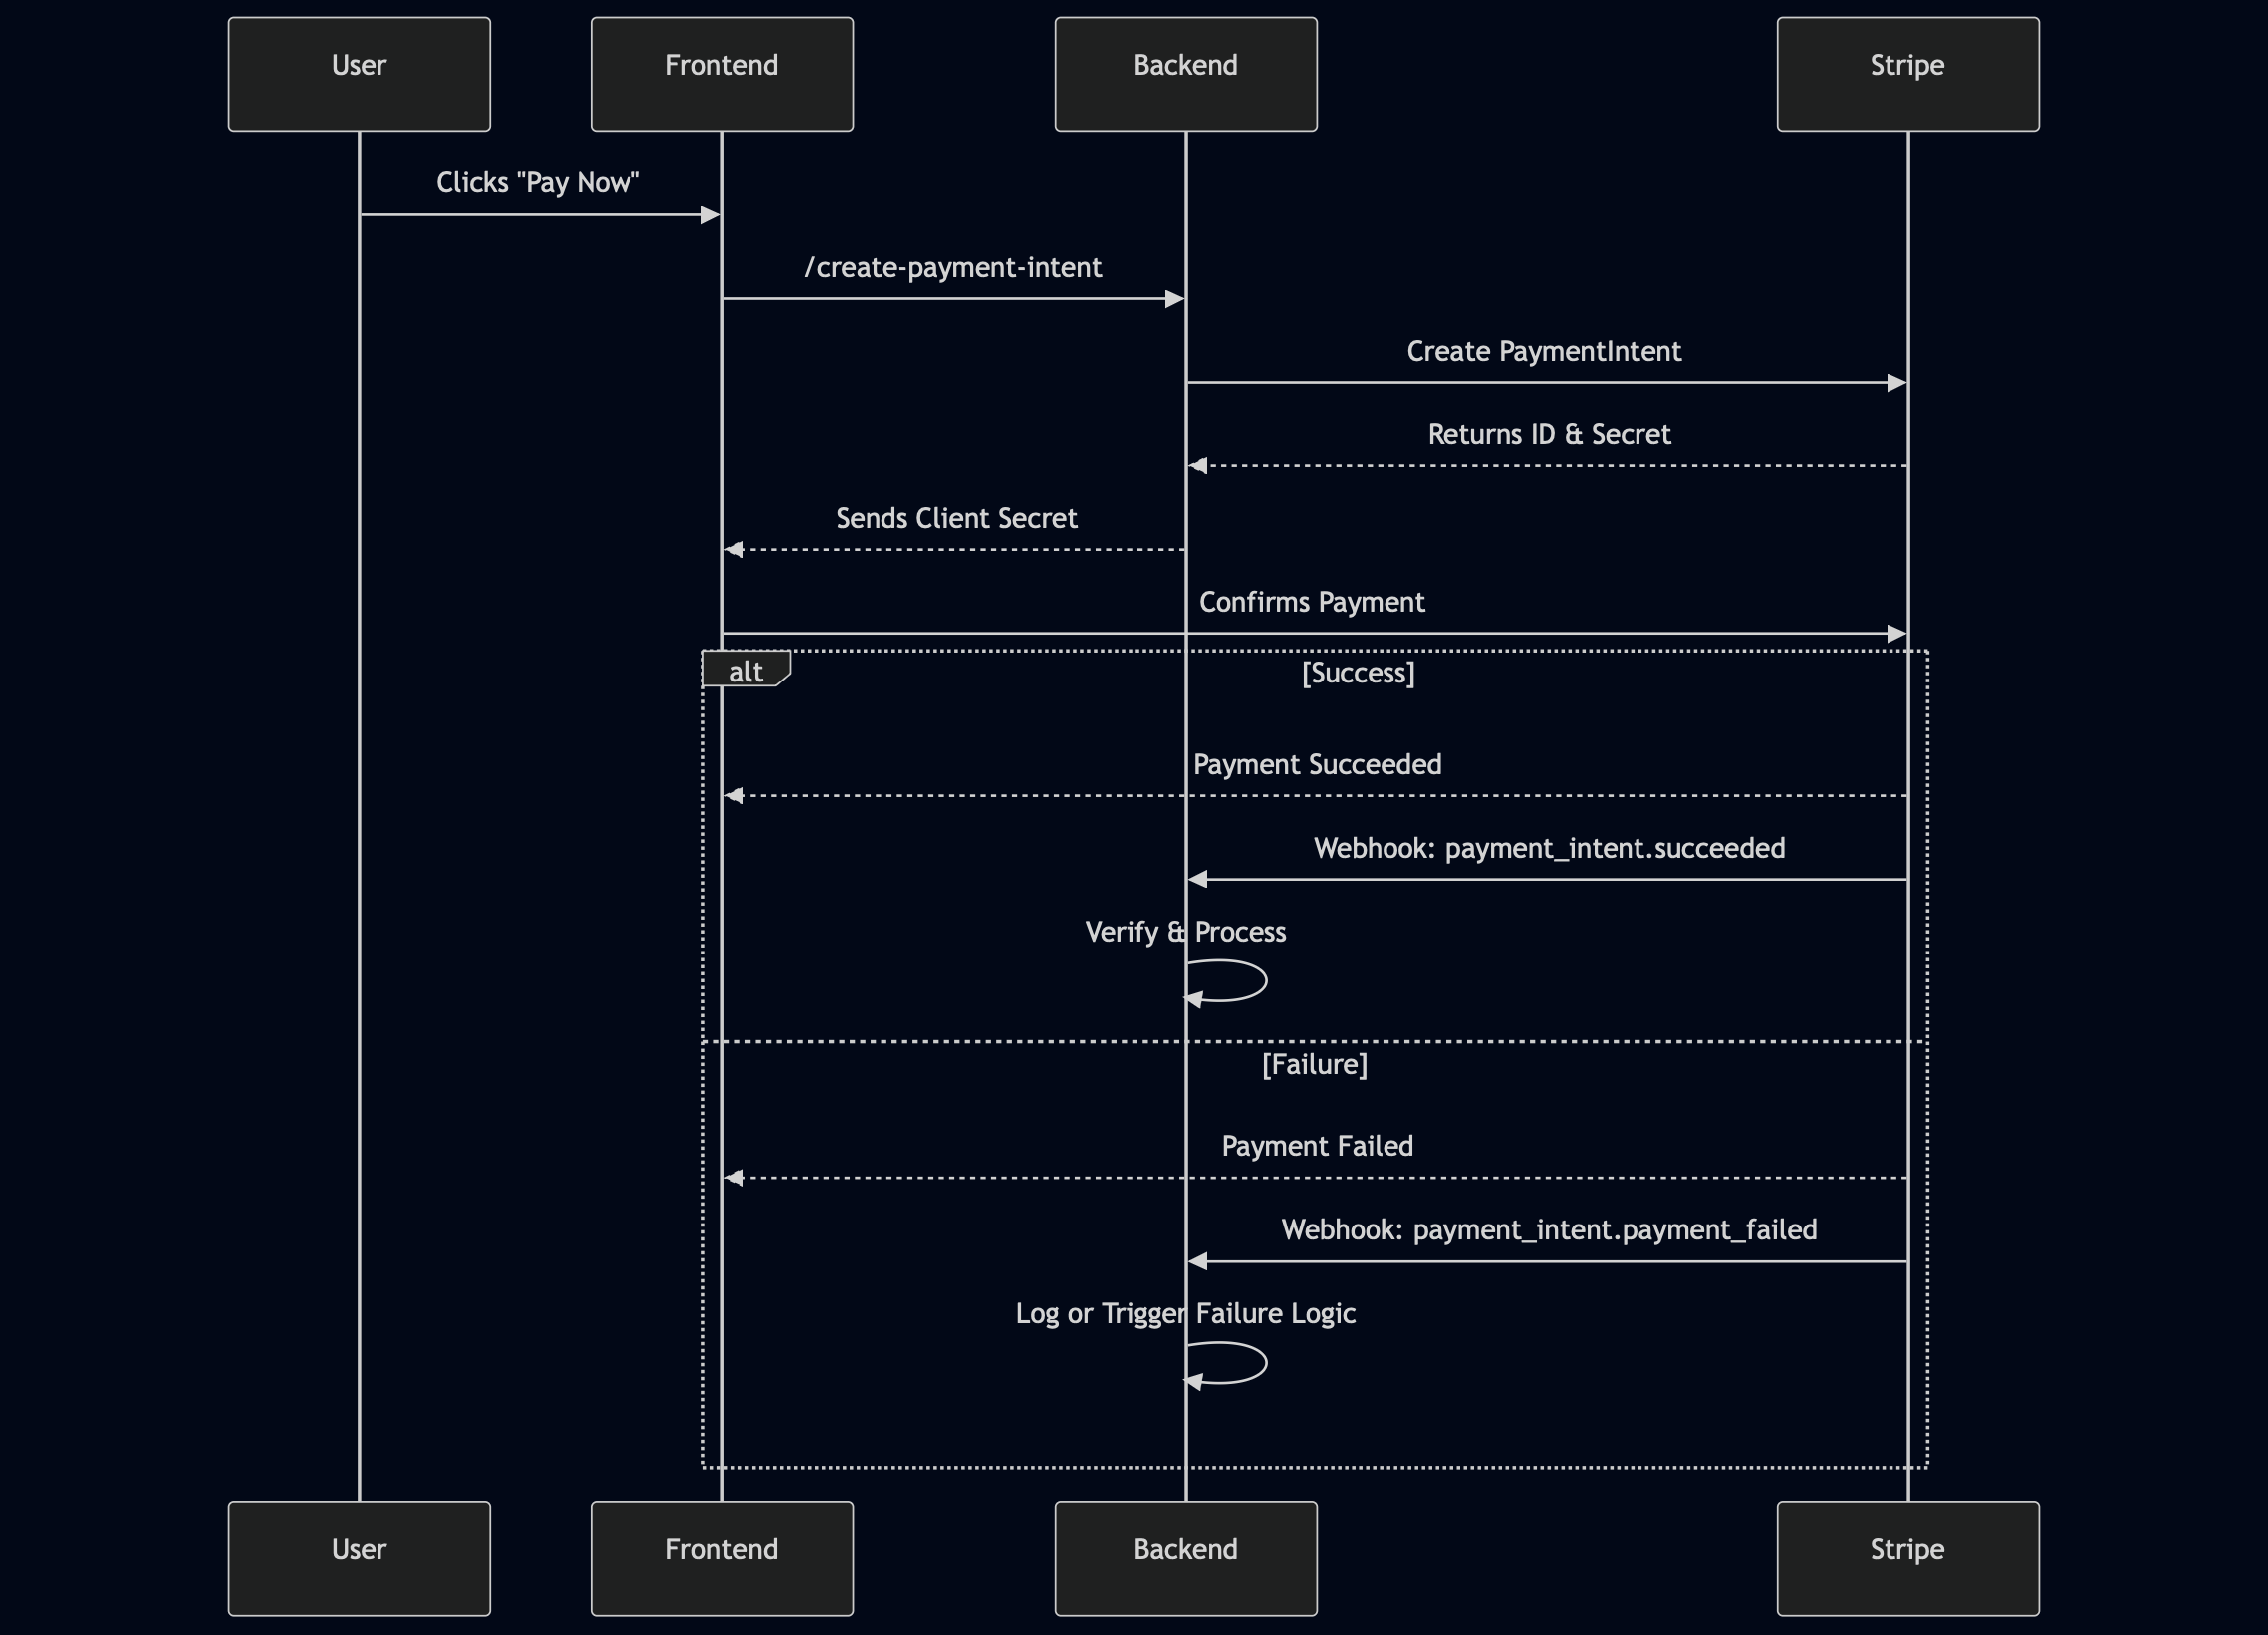
🔄 Key Insight: Stripe doesn’t wait for you to call it back. It fires the webhook asynchronously, expecting your server to be ready and exposed now.
⚙️ The Dev Pain: Localhost & Webhooks
So here’s where things break down:
- You’re testing on http://localhost:3000
- Stripe tries to hit https://yourdomain.com/api/webhook
- You’re not deployed yet. Or worse—you are, but don’t want to test prod.
And unlike synchronous API responses, Stripe doesn’t show you local console logs, stack traces, or variable states.
So what’s the workaround?
🚀 Enter ngrok: Bridging the Local-Cloud Gap
ngrok allows you to expose a local HTTP server to the internet via a secure tunnel. It’s not just a hack—it’s a critical tool in modern full-stack development.
Here’s my enhanced setup flow:
🛠️ 1. Install ngrok
brew install ngrok # MacOS
# Follow for your browser
# https://ngrok.com/downloads
(OPTIONAL) Authenticate your session for custom subdomains:
ngrok config add-authtoken <your_token_here>🛠️ 2. Start the Tunnel
If your local app runs on port 3000:
ngrok http 3000 # expecting 3000 is your port for backend serviceYou’ll receive a public HTTPS URL, e.g.:
https://friendly-dolphin.ngrok.io🛠️ 3. Set the Webhook Endpoint in Stripe
In Stripe Dashboard → Developers → Webhooks:
https://friendly-dolphin.ngrok.io/api/stripe/webhook🧪 4. Stripe Webhook Handler: Advanced Version
// pages/api/stripe/webhook.ts
import { buffer } from 'micro';
import Stripe from 'stripe';

export const config = {
  api: {
    bodyParser: false,
  },
};

const stripe = new Stripe(process.env.STRIPE_SECRET_KEY!, {
  apiVersion: '2023-08-16',
});

export default async function handler(req, res) {
  const sig = req.headers['stripe-signature']!;
  const buf = await buffer(req);

  let event: Stripe.Event;

  try {
    event = stripe.webhooks.constructEvent(
      buf,
      sig,
      process.env.STRIPE_WEBHOOK_SECRET!
    );
  } catch (err) {
    console.error('[Webhook Signature Error]', err.message);
    return res.status(400).send(`Webhook Error: ${err.message}`);
  }

  // Route by event type
  switch (event.type) {
    case 'payment_intent.succeeded':
      const paymentIntent = event.data.object as Stripe.PaymentIntent;
      console.log('✅ Payment succeeded:', paymentIntent.id);
      // Add post-payment logic here
      break;

    case 'payment_intent.payment_failed':
      const failedIntent = event.data.object as Stripe.PaymentIntent;
      console.warn('❌ Payment failed:', failedIntent.id);
      break;

    default:
      console.log(`Unhandled event type: ${event.type}`);
  }

  res.status(200).json({ received: true });
}
Tips & Tricks:
- 🔁 ngrok URL changes on every restart→ Use ngrok config with reserved domains (requires a free account with auth token or paid plan)
- 📦 Webhook fails silently?→ Use Stripe CLI to tail events, replay payloads, and get verbose error output
- 🚨 Webhook fails and doesn’t retry?→ Stripe automatically retries with exponential backoff, but only a few times. For testing, manually retry from the Stripe Dashboard
- 🔄 Missed webhook during server restart?→ Use the Stripe Dashboard → Events tab to manually replay the event during testing
- 🧪 End-to-end test automation→ Use Stripe test clocks for time-based flow and billing scenarios
- 🧾 Log the full event, not just status→ Store raw events and Stripe IDs in your DB for traceability and replay safety
- 🔐 Always verify webhook signatures→ Never trust incoming requests blindly—even if they look like they come from Stripe
- 🧵 Structure webhook handler for scalability→ Use an internal event dispatcher or switch-case router per event.type, and consider queueing if the processing is heavy
🔚 Conclusion
Testing Stripe webhooks without deploying is not just possible—it’s efficient and repeatable.
With ngrok, I turned a one-way black box into a two-way conversation.
You can:
- Debug with live logs and breakpoints.
- Validate edge-case flows (.payment_failed, .charge.dispute.created, etc.).
- Stay productive without committing early or guessing blindly.
If you’re building payments, don’t just integrate—instrument, test, and verify confidently.